Another beer review here for ya.
Very Dark beer, with not a whole lot of head retention. Maybe a finger of head when you first poor which reduces fast and leaves lacing throughout.
Smells pretty sweet to begin with, but opens up as it warms up. As it warms up I smell more roasted malts and alcohol, the alcohol smell got strong enough that it actually made my eyes water.
Great roasted malt taste with some dark fruits and some licorice. Finishes with a slightly hoppy and alcohol taste.
Medium mouth feel, great taste but somewhat low on drinkability due to the alcohol. This newer bottle is 10.14 abv.
Serving type: bottle
Saturday, January 15, 2011
Friday, January 14, 2011
First Beer Review
I completed my first beer review on BA today, thought it would be a good thing to post.
Deschutes Brewery Obsidian Stout.
A(appearance): Completely dark, about 1 finger of caramel colored head with lacing that hangs around throughout.
S(smell): Roasted barley with some sweetness too.
T(taste): Very roasted flavor, finishes smooth with a pretty strong hoppy flavor.
M(mouthfeel): Full bodied and thick mouthfeel, not syrupy but creamy.
D(drinkability): Fantastic drinkability with no over-powering flavors. Goes down easy, just an all around great beer!
Serving type: bottle
It will be interesting to be able to look at this in the coming month/years and see how my palate has developed to pick up on some of the more subtle tastes of a given beer.
Thursday, January 13, 2011
New Beer!!!
Today I put in my order at Northern Brewer for my second beer kit. The site was a recommendation that I found on the BA (Beer Advocate) forums. The site seems well put together and professional and they have a ton of beer kits, equipment for all types of brewing and setups. I'm really excited to get this next kit brewing.
I went with their Honey Brown Ale Extract kit. For now until I have some more money for an all grain brewing setup I'm going to stick with extract recipes. The kit once again comes with all the ingredients and instructions on how to make it. The Cream Stout I'm working on now has about another 3 or so weeks until its done and this Honey Brown is going to take about 6 weeks total. I'll keep you all updated and I'll get some more pictures up when I get the next kit. Also I've got a glass carboy coming which will be cool because that way I can actually see the fermentation happening.
I went with their Honey Brown Ale Extract kit. For now until I have some more money for an all grain brewing setup I'm going to stick with extract recipes. The kit once again comes with all the ingredients and instructions on how to make it. The Cream Stout I'm working on now has about another 3 or so weeks until its done and this Honey Brown is going to take about 6 weeks total. I'll keep you all updated and I'll get some more pictures up when I get the next kit. Also I've got a glass carboy coming which will be cool because that way I can actually see the fermentation happening.
Wednesday, January 12, 2011
Not a Total Loss
I've been posting on the forums over at beer advocate and asking questions about our brewing mistake. Most the replies have been pretty positive and they tell me that it's not going to be a problem. I guess we will find out right about the same time we get to taste the beer. It has been one night but I can see carbonation bubbling up through the airlock, this is a really neat process and I'm loving all that I am learning.
Tuesday, January 11, 2011
Day Number 1
Today we began our journey into home brewing greatness. It has been our desire to pull the trigger on this endeavor for quite a while. This past weekend we decided the waiting would end and we bought our first home brewing kit from Reno Homebrewer in Reno Nevada. The staff was extremely helpful and informative and their prices reasonable, they also had a wide selection of micro-brew beer. The kit includes all the ingredients for your selected brew type, two 6 gallon buckets (one for fermentation and one for bottling), two spigots, an air lock, bottle filler, 5' of tubing, bottle caps, bottle capper, Byron Burch's "Brewing Quality Beers", and printed instructions on both how to brew the selected brew and how to use the equipment. The following will be the step by step process we followed to brew our first beer. Right or Wrong, these are the steps we followed and I will share all triumphs and failures with you in hopes that we become better brewers.
Step 1/2. Sterilize all equipment you are going to use in this process. We used Iodophor, 1 cap full per 5 gallons of water.

Step 1. Boiling the water in a large pot. This is pretty self explanatory, we used a large stock pot and filled it to within 2 inches of the top and boiled the water. Be careful on this step, it's easy to underestimate how much space your ingredients will take up, you don't want this to boil over on your stove, it wouldn't be pretty.
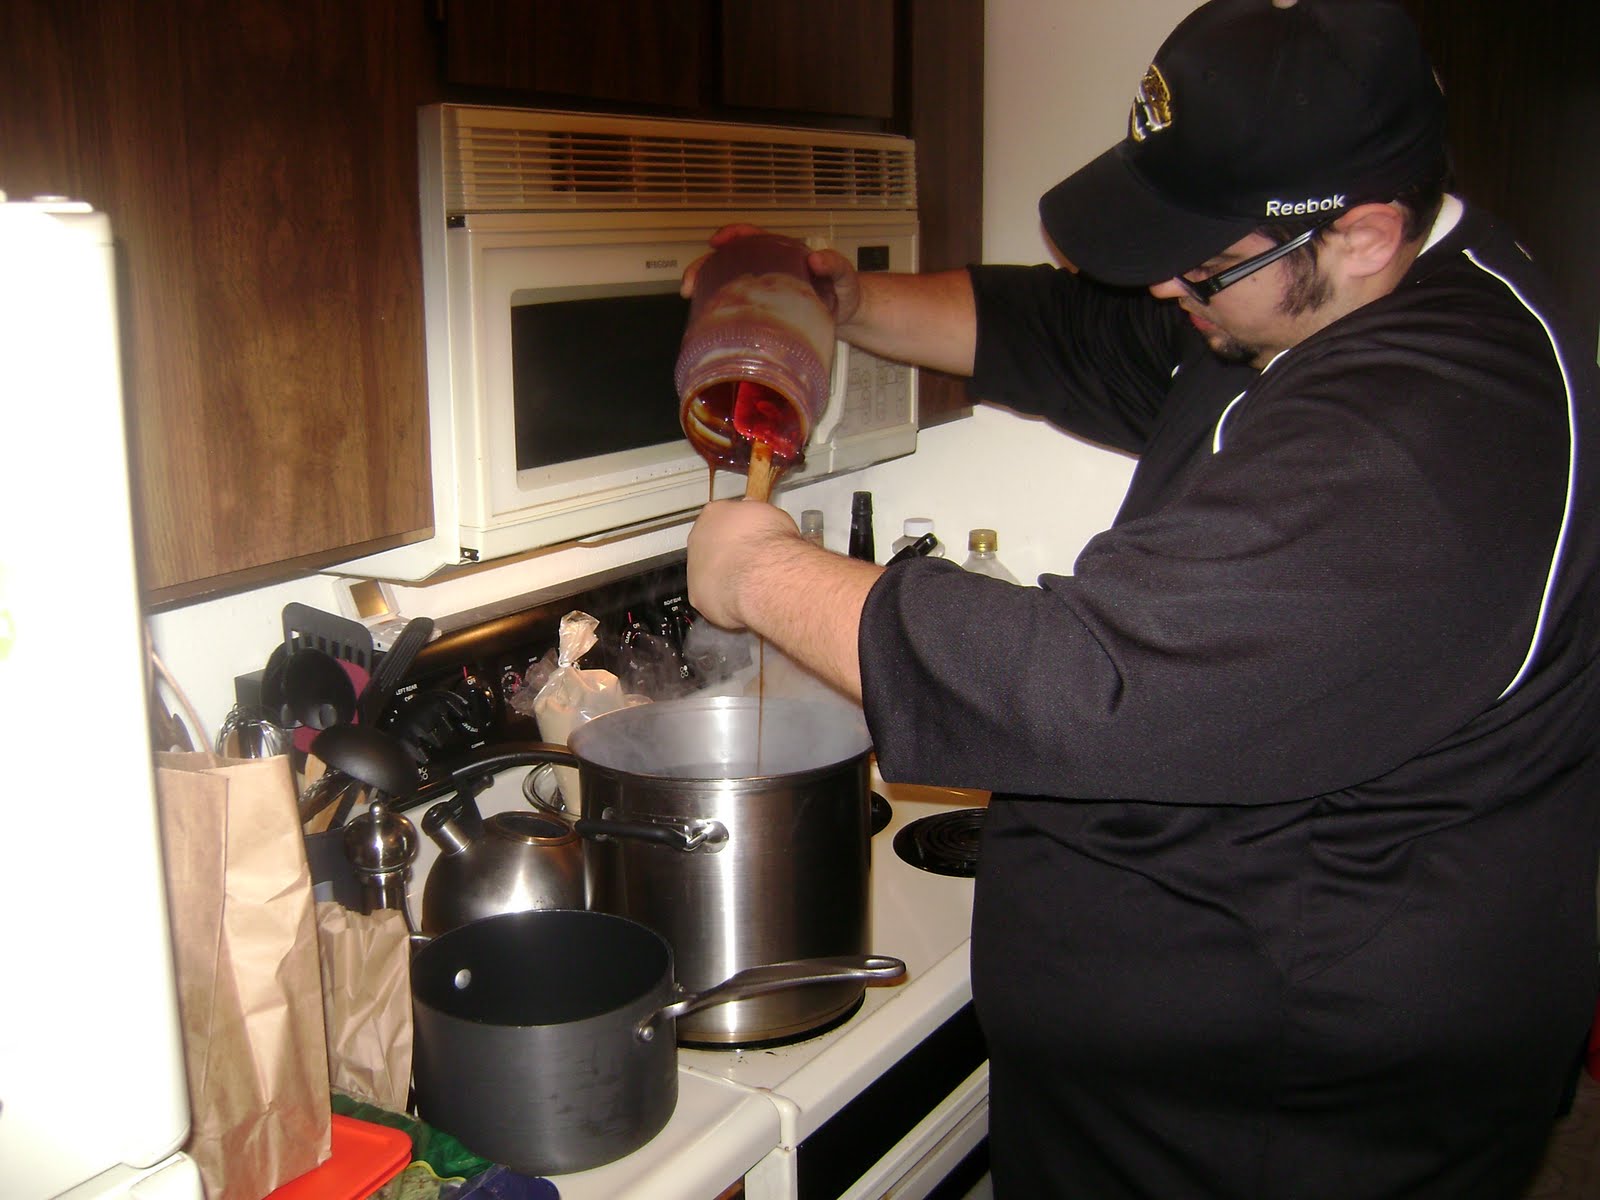
2. After we brought the water to a slow boil we added the 6 lbs. of amber malt extract. If you are using a large jug of the extract like we did you may want to set it in a sink or bucket full of hot water to make it more viscous because this stuff is really sticky. We waited for the malt extract to mostly dissolve before we started adding other ingredients. I'm going to include adding the other ingredients into this step because we added them one after another. I will however include a list of the ingredients we used.
6 lbs Amber Malt Extract
1 lb Black Malt
1 1/2 lbs. Dark Dry Malt Extract (powder)
1 lb Flaked Barley
2 oz. Cascade hops (pellets)

3. We let the wort "boil" (I use the term boil lightly because it wasn't actually boiling) for an hour at about 200 °F. During the boil we watched the wort go from having a very thick frothy "head" to having almost no head at all. I don't know what causes this but I think it has something to do with hitting the "heat break".


4. After the boil we took the wort and poured it through a strainer into the sanitized bucket. We had a semi-hard time with this because we had a pretty small stainer and the wort is pretty thick so it wasn't easy to get all of the liquid out.

4 1/2. We poured enough sanitized water into the wort to bring the temperature down to below 90°F. This is the temperature that is safe for the yeast.

5. We put the yeast in the wort. In order to do this I simply spread the yeast over the top of the wort and left it. We put a lid on the fermenter and stuck the air lock in the lid. The air lock had a splash of cheap vodka in it per the instructions. I'm assuming this is to protect the wort from contamination. We then stuck the fermentation bucket in a corner of the house that stayed between 60 and 75 °F again, according to the instructions.
Failure #1. Tonight we realized that we did not read the side of the bucket and although we thought we were filling it to 5 gallons we actually filled it to 6 gallons. We aren't sure what this will do to the brew but we are hoping it will still turn out all right. I'll let you know what happens.
Step 1/2. Sterilize all equipment you are going to use in this process. We used Iodophor, 1 cap full per 5 gallons of water.

Step 1. Boiling the water in a large pot. This is pretty self explanatory, we used a large stock pot and filled it to within 2 inches of the top and boiled the water. Be careful on this step, it's easy to underestimate how much space your ingredients will take up, you don't want this to boil over on your stove, it wouldn't be pretty.
2. After we brought the water to a slow boil we added the 6 lbs. of amber malt extract. If you are using a large jug of the extract like we did you may want to set it in a sink or bucket full of hot water to make it more viscous because this stuff is really sticky. We waited for the malt extract to mostly dissolve before we started adding other ingredients. I'm going to include adding the other ingredients into this step because we added them one after another. I will however include a list of the ingredients we used.
6 lbs Amber Malt Extract
1 lb Black Malt
1 1/2 lbs. Dark Dry Malt Extract (powder)
1 lb Flaked Barley
2 oz. Cascade hops (pellets)
3. We let the wort "boil" (I use the term boil lightly because it wasn't actually boiling) for an hour at about 200 °F. During the boil we watched the wort go from having a very thick frothy "head" to having almost no head at all. I don't know what causes this but I think it has something to do with hitting the "heat break".


4. After the boil we took the wort and poured it through a strainer into the sanitized bucket. We had a semi-hard time with this because we had a pretty small stainer and the wort is pretty thick so it wasn't easy to get all of the liquid out.

4 1/2. We poured enough sanitized water into the wort to bring the temperature down to below 90°F. This is the temperature that is safe for the yeast.

5. We put the yeast in the wort. In order to do this I simply spread the yeast over the top of the wort and left it. We put a lid on the fermenter and stuck the air lock in the lid. The air lock had a splash of cheap vodka in it per the instructions. I'm assuming this is to protect the wort from contamination. We then stuck the fermentation bucket in a corner of the house that stayed between 60 and 75 °F again, according to the instructions.
Failure #1. Tonight we realized that we did not read the side of the bucket and although we thought we were filling it to 5 gallons we actually filled it to 6 gallons. We aren't sure what this will do to the brew but we are hoping it will still turn out all right. I'll let you know what happens.
Subscribe to:
Comments (Atom)